People Counting of WeLanc IP cameras measure the number of people that pass through a certain entrance. This feature is a great tool to evaluate traffic for a shopping center, retail stores, museums or attractions, etc.
Popular Applications
- 1. Retail Stores
① Gain information about foot traffic in the store to calculate conversion rate and per customer transaction.
② Gain information about foot traffic in a product display area to evaluate product placement and promotion events.
③ Optimize resource allocation based on foot traffic to improve customer service quality.
- 2. Shopping Malls
People counting can help optimize infrastructure by placing a bullet camera in each store to compare/ improve visitor satisfaction based on the number of IN/OUT. In addition, by comparing areas of high/low traffic, the shopping mall can adjust retailer’s rent to make the price more reasonable.
Installation
People counting detects human figures in terms of the appropriate ratio between head and shoulder. So it is important the IP camera is mounted high enough and are able to capture the upper part of any human figure.
Install the camera in an overlooking position in front of the entrance, with a recommended height of 2.5 to 3 m.
Recommended view angle is 15°±3°, and recommended surveillance area width is 0.8 to 3 m.
Interference:
① Illumination: If no illumination is available, it is recommended to install one 25 W light bulb every 1 meter at in front of the detection area.
② Obstruction: Faces that are covered by objects such as umbrellas cannot be detected.
③ Scenes: Recommended for indoor environment, such as entrances of stores and supermarkets as well as indoor passages.
④ Target size: The head width of target should be between 120 to 160 pixels. Smaller or larger sizes will affect detection.
Setting
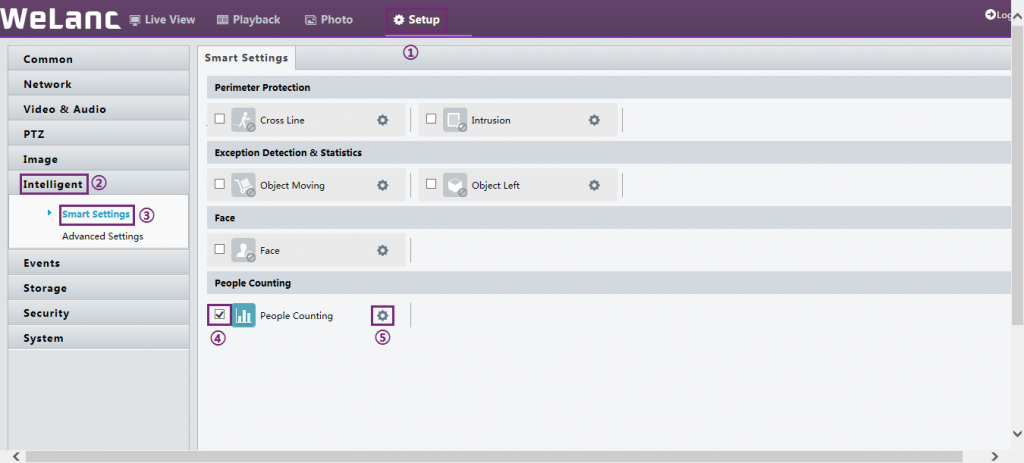
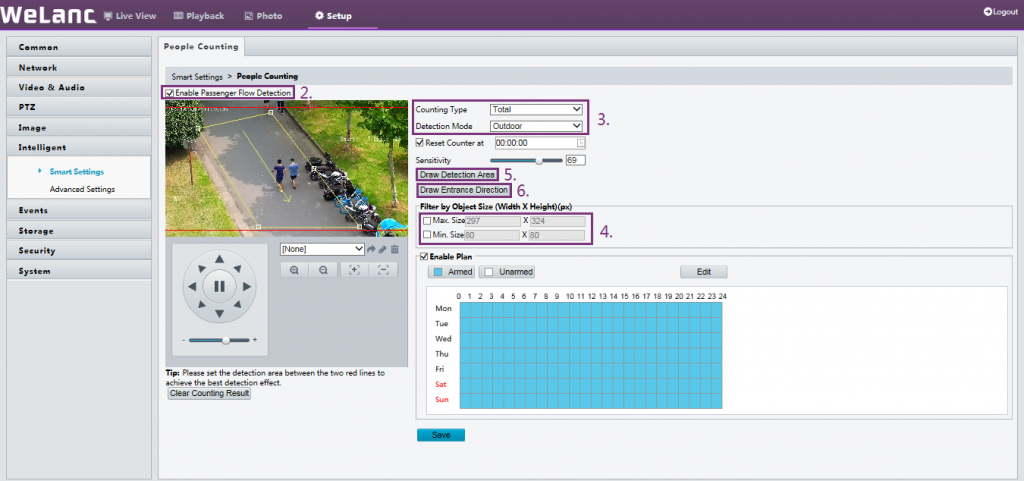
- Click Setup > Intelligent > Smart Settings. Choose People Counting and then click
 .
. - Select Enable Passenger Flow Detection.
- Counting Type: Select whether to count people entered, people left or total (both).
- Set Max. Size and Min. Size under Filter by Object Size. Only objects within the size range will be counted; others will be filtered and not counted. The maximum width or height must be greater than the minimum width or height.
- Click Draw Detection Area, and then draw a detection area on the preview window on the left, e.g., a square.
- Click Draw Entrance Direction, and then draw the direction on the preview window on the left. The direction is usually vertical or sloping.